Quick Start Guide for Vendor
Quick Start Guide for Vendor
Kalay Cloud VMS
1. Your Role in the Ecosystem
Section titled “1. Your Role in the Ecosystem”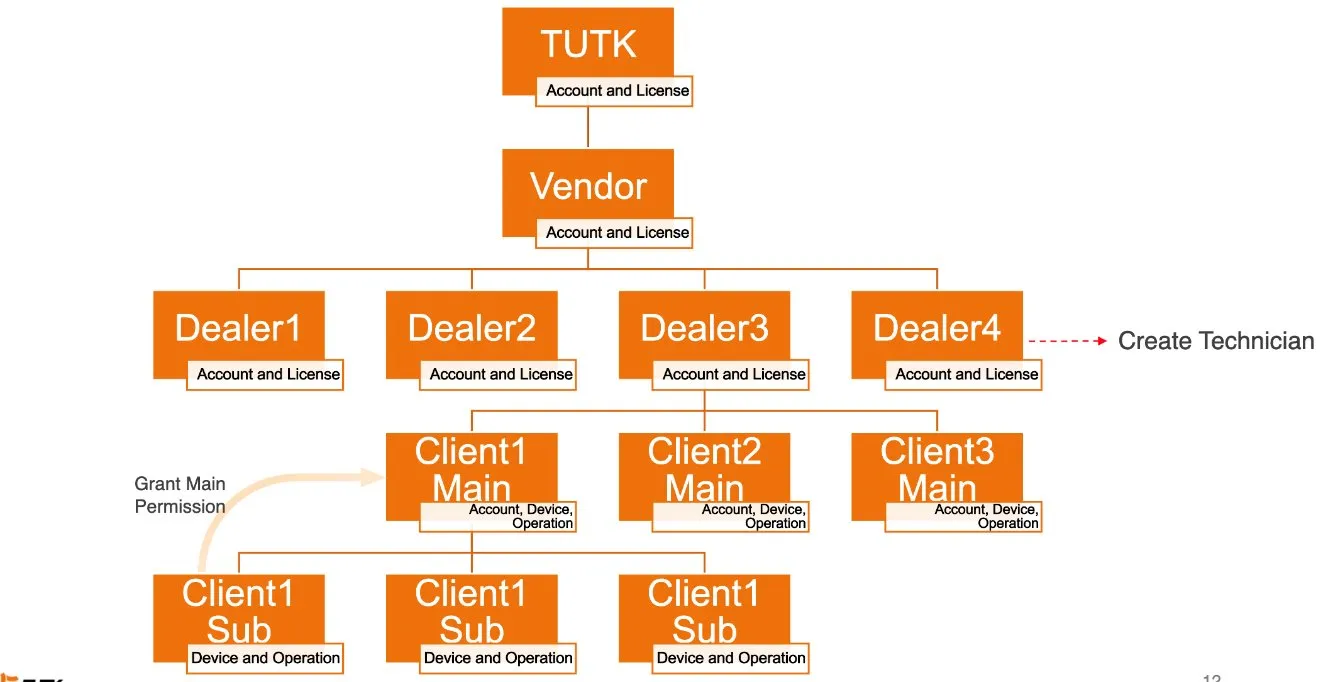
Figure: Organization and role structure
Key Terms
Section titled “Key Terms”- VMS Channel: a licensed slot --- each connected camera channel consumes one.
- Cloud Recording Plan: a cloud storage subscription, differentiated by retention days and recording mode (event vs. fulltime).
- Dealer: your downstream partner who provisions Clients and assigns Technicians for device installation.
- Activation Code: a TUTK-provided code that unlocks cloud recording plan quota in your account.
2. Before You Start
Section titled “2. Before You Start”-
Vendor Account Activated --- created by TUTK, email activation completed.
-
VMS Channel Allocation Visible --- licensed channels displayed in your dashboard.
-
Cloud Recording Codes Received --- activation codes obtained from TUTK.
3. Getting Started --- Your First 10 Minutes
Section titled “3. Getting Started --- Your First 10 Minutes”Step 1: Log In (1 min)
Section titled “Step 1: Log In (1 min)”-
Open your activation email from TUTK.
-
Click the activation link, enter account email and paste default password.
-
Log in at your Kalay Cloud VMS URL.
-
Accept the cookie banner if it appears.
-
Wait for the Dashboard to load.
What success looks like: You land on the Dashboard with summary cards, left navigation, and the Management menu visible.
Step 2: Review Your Dashboard (2 min)
Section titled “Step 2: Review Your Dashboard (2 min)”| Dashboard Area | What It Tells You |
|---|---|
| All Accounts / Dealer / Main / Sub | Total scale --- how many accounts exist across all layers |
| Cloud Recording Plan (Event) | Assigned vs. total per tier. Click “Add” to enter TUTK activation codes. |
| Cloud Recording Plan (Fulltime) | Same as above for continuous recording plans |
| VMS Channel | Assigned vs. total licensed channels --- check capacity before allocating to new Dealers |
| Devices (lower section) | Breakdown by type (Camera, NVR, Bridge) and per-Dealer table with status |
| Login chart (bottom) | Login activity --- useful for auditing, not required for daily setup |
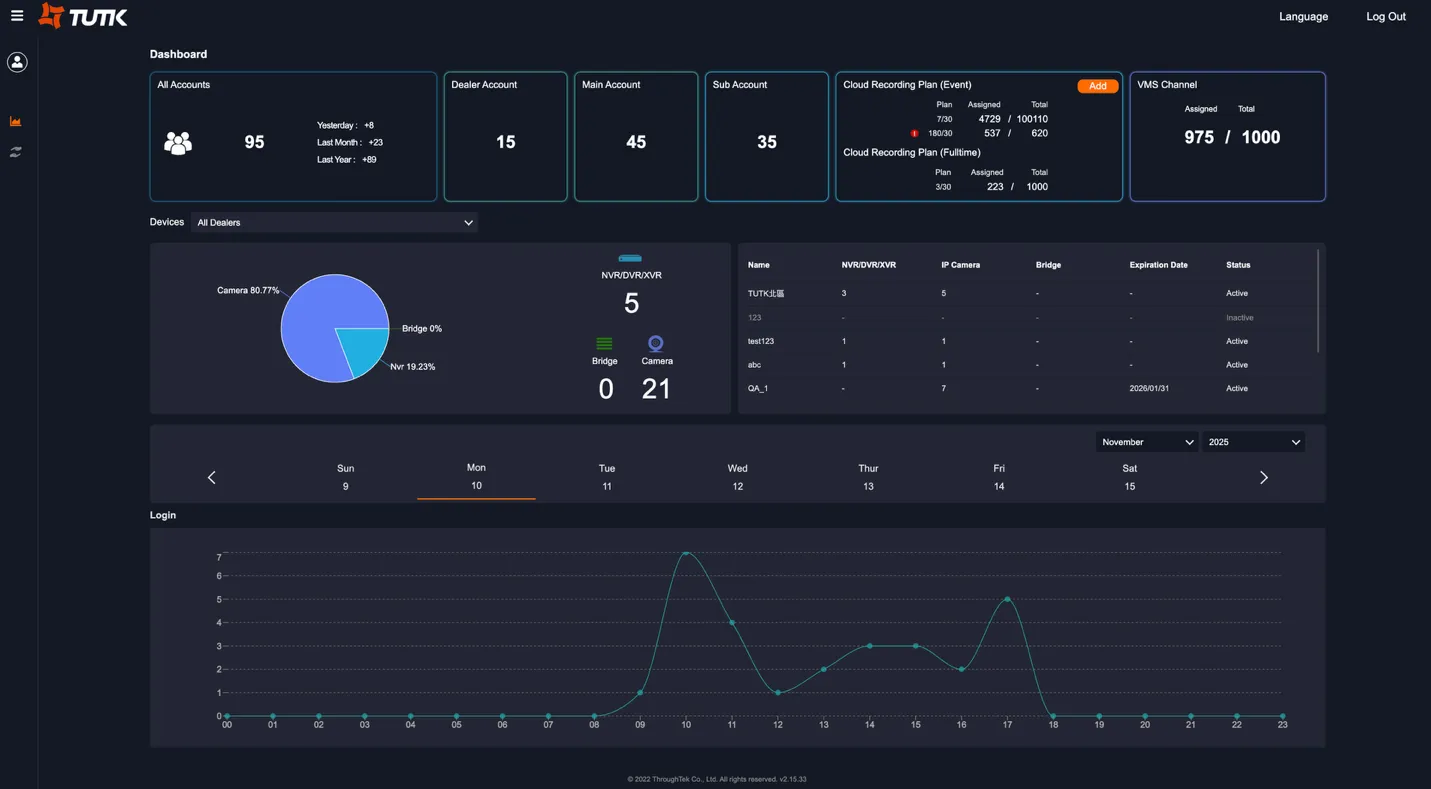
Figure: Vendor Dashboard --- summary cards (top), device breakdown (middle), login activity (bottom)
Step 3: Create Your First Dealer (5 min)
Section titled “Step 3: Create Your First Dealer (5 min)”-
Navigate to Management -> Dealers in the left menu.
-
Click “Add Dealer” (top right).
-
Configure the Dealer organization (see field reference below).
-
Allocate VMS Channels and Cloud Recording Plans.
-
Click Save, then create the Dealer admin account.
-
The Dealer receives an activation email automatically.
Dealer Configuration Fields
Section titled “Dealer Configuration Fields”| Field | Required | Notes |
|---|---|---|
| Company Name | Yes | Dealer organization name as shown in the platform |
| Logo | No | Brand logo for white-label display |
| Expiration Date | No | Leave blank for unlimited; set a date for time-limited partnerships |
| Theme | No | 6 color options or TUTK default |
| Custom URL | No | Dedicated web address; requires SSL certificate upload |
| VMS License | Yes | Number of channels to allocate (cannot exceed your available quota) |
| Cloud Recording Plans | No | Set limits per plan type; leave blank to disable for this Dealer |
Cloud Recording Plan Types
Section titled “Cloud Recording Plan Types”| Plan Code | Mode | Retention | Contract |
|---|---|---|---|
| 7/30 | Event | 7 days | 30-day billing cycle |
| 30/30 | Event | 30 days | 30-day billing cycle |
| 7/30 | Fulltime | 7 days | 30-day billing cycle |
| 30/30 | Fulltime | 30 days | 30-day billing cycle |
Creating the Dealer Admin Account
Section titled “Creating the Dealer Admin Account”After saving, an account section appears:
- Email (required) --- Dealer admin’s email address
- Name --- display name in the platform
- Mobile --- optional contact number
- LINE ID --- optional LINE account for notifications
Click ✓ to complete. The Dealer receives an activation email automatically.
Additional Dealer Accounts
Section titled “Additional Dealer Accounts”You can add multiple admin accounts per Dealer if needed. Use Edit (✎) to modify account information. Use Delete (🗑) to remove accounts --- deletion is only allowed if the Dealer has no Clients.
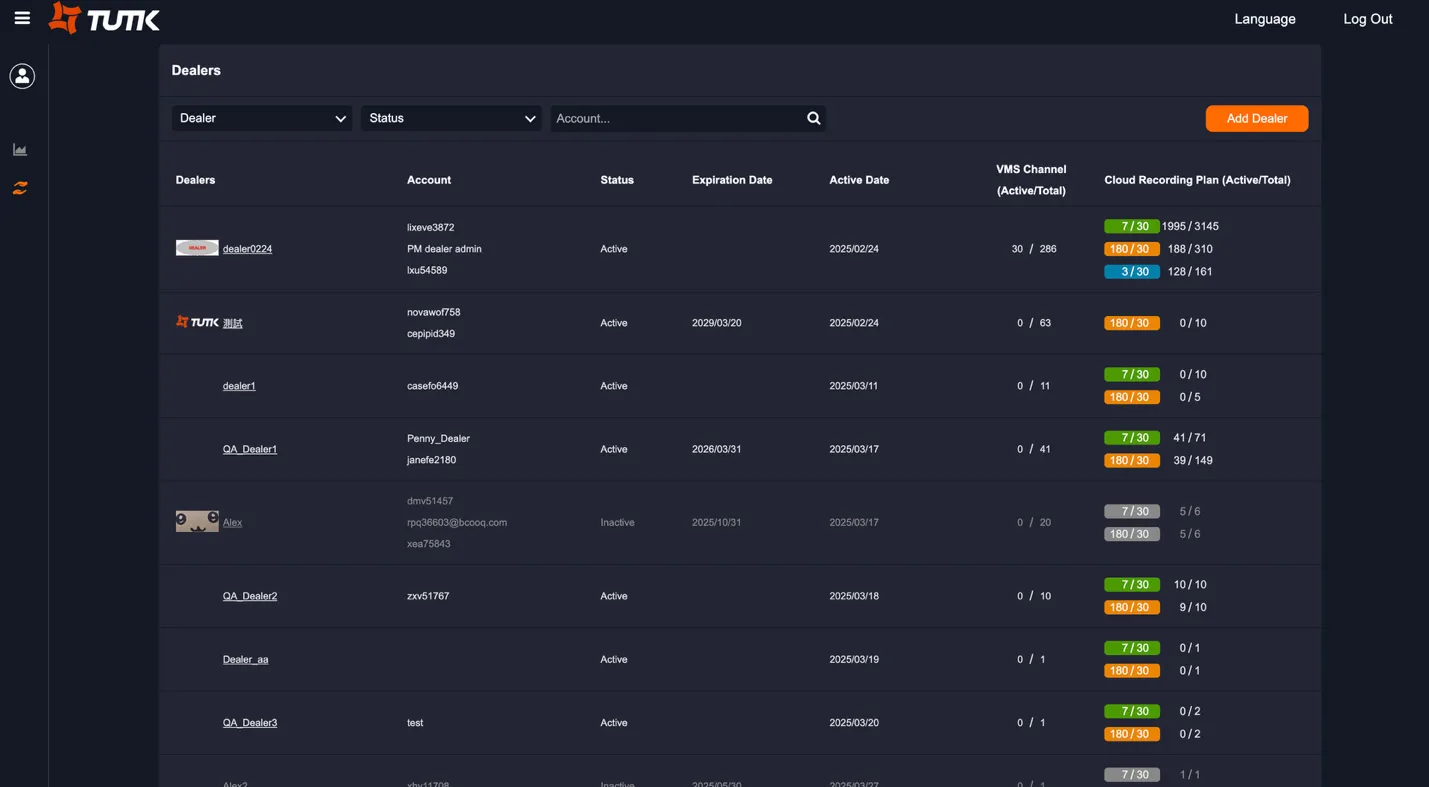
Figure: Dealer Management --- status, VMS channels (active/total), cloud plan allocation per Dealer
Step 4: Verify Setup (2 min)
Section titled “Step 4: Verify Setup (2 min)”- Return to Dashboard --- confirm the Dealer appears in the per-Dealer device table.
- Go to Management -> Dealers --- confirm the Dealer shows as Active with correct allocations.
Done! Your first Dealer is ready to create Clients and assign Technicians.
4. Ongoing Operations
Section titled “4. Ongoing Operations”After initial setup, your Vendor work is Dealer network management (your primary scope) plus escalation support (read-only downstream visibility).
| Page | Permission | When to Use |
|---|---|---|
| Dashboard | Full Access | Health check: account scale, VMS capacity, cloud plan usage, login activity |
| Dealer Management | CRUD | Create/edit/deactivate Dealers, adjust allocations, check status and expiry |
| License Allocation | Full Access | Distribute VMS channels, enter cloud recording activation codes |
| Client Management | Read Only | Escalation only: verify Client record when Dealer reports an issue |
| Device Statistics | Read Only | Escalation only: verify device/owner/channel when issue is device-level |
Routing Guide
Section titled “Routing Guide”- Capacity or health check? -> Dashboard
- Create, edit, or allocate a Dealer? -> Dealer Management
- Dealer escalated a Client issue? -> Client Management (read-only)
- Device-level escalation? -> Device Statistics (read-only)
Escalation Boundaries
Section titled “Escalation Boundaries”Route issues to the correct owner:
| Role | Owns |
|---|---|
| Vendor (you) | Dealer network, license allocation, platform health, escalation triage |
| Dealer | Client provisioning, Technician assignment, customer handoff |
| Client Main | Sub-account management, device visibility within their organization |
| Client Sub | Day-to-day monitoring within assigned scope |
5. Troubleshooting
Section titled “5. Troubleshooting”Dealer Cannot Access System
Section titled “Dealer Cannot Access System”-
Verify Dealer status is “Active” in Management -> Dealers.
-
Check that the Expiration Date has not passed.
-
Confirm the Dealer admin received and completed the activation email.
-
If all above check out, escalate to TUTK support.
Client Not Appearing in Client List
Section titled “Client Not Appearing in Client List”-
Confirm the Dealer actually created the Client (Vendor has read-only access).
-
Check Client status (Active/Inactive) via Management -> Clients.
-
Use search to locate by email or name.
-
Contact the Dealer to confirm Client creation.
License Allocation Issues
Section titled “License Allocation Issues”-
Check total purchased licenses on the Dashboard (VMS Channel card).
-
Compare Assigned vs. Total across all Dealers.
-
Ensure no single Dealer is over-allocated.
-
If quota is exhausted, contact TUTK to purchase additional licenses.
Next Steps
Section titled “Next Steps”- Share the Dealer Quick Start Guide with each new Dealer to set up Clients and Technicians.
Version History
Section titled “Version History”| Date | Description | Author |
|---|---|---|
| 2025/11/12 | Quick Start Guide for Vendor v1.0 | Jonas Chen |
| 2025/11/14 | Add prerequisites and role structure | Jonas Chen |
| 2026/03/20 | Consolidate structure | Louis/Jonas Chen |