Quick Start Guide for Technician
Quick Start Guide for Technician
Kalay Cloud VMS
1. Your Role in the Ecosystem
Section titled “1. Your Role in the Ecosystem”Key Terms
Section titled “Key Terms”- Installation Task: a project assigned to you by the Dealer with a specific Client, timeline, and scope.
- UDID: Unique Device Identifier --- used to identify each camera or recorder in the system.
- Cloud Recording Plan: a cloud storage subscription for event-based or fulltime video recording.
- Installation Complete: the button you click to finalize the task --- notifies the Client Main account and records the completion timestamp.
2. Before You Start
Section titled “2. Before You Start”-
Technician Account Activated --- created by your Dealer, email activation completed.
-
Installation Task Assigned --- a project has been assigned to you by the Dealer with Client details and timeline.
-
Devices Ready for Binding --- cameras/devices are powered on, connected to the network, and in binding mode.
-
Cloud Plans Allocated (if required) --- the Dealer has assigned cloud recording plans to the Client.
3. Getting Started --- Your Installation Workflow
Section titled “3. Getting Started --- Your Installation Workflow”Follow these steps to log in, add devices, configure them, and complete your installation task.
Step 1: Log In and Select Client
Section titled “Step 1: Log In and Select Client”-
Check your email for “Please Activate Your Account” from the Dealer.
-
Follow the activation link, enter account email and paste default password.
-
Log in at your Kalay Cloud VMS URL.
-
Select the assigned Client to begin working.
What success looks like: You see the Device Status page with the Installation Period bar at the top showing your task timeline and the “Installation Complete” button.
Step 2: Review Your Workspace
Section titled “Step 2: Review Your Workspace”The Device Status page is your primary workspace. It shows:
| Area | What It Shows |
|---|---|
| Installation Period (top bar) | Your task timeline with start and end dates |
| Installation Complete (top right) | Click when all devices are installed and verified |
| Add (orange button) | Add new devices using QR Scan, WiFi QR, or Barcode |
| Device List | Location, Device, UDID, Type, Channel, Cloud Recording status, Member count, Online status |
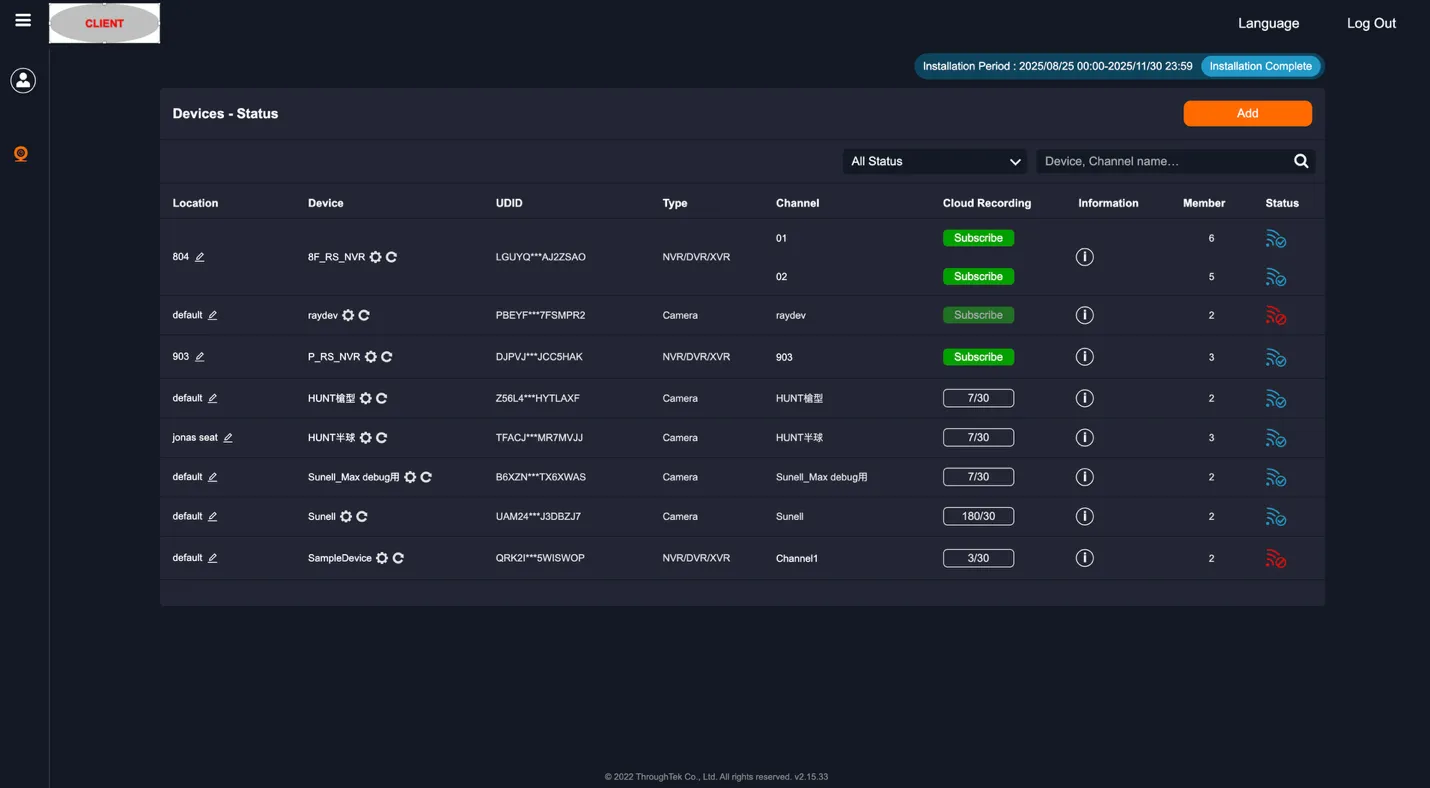
Figure: Technician workspace --- Installation Period bar (top), “Installation Complete” and “Add” buttons, device list with status
Step 3: Add Devices
Section titled “Step 3: Add Devices”Method 1: QR Code Scanning (Recommended)
Section titled “Method 1: QR Code Scanning (Recommended)”-
Click the “Add” button.
-
Select the “Scan” tab.
-
Allow camera access when prompted.
-
Point your computer/tablet camera at the device QR code (on the device label or in device settings -> TUTK tab -> Bind QR code).
-
Device information loads automatically.
-
Click OK to add.
Method 2: QR Code for WiFi Cameras
Section titled “Method 2: QR Code for WiFi Cameras”-
Click Add -> “QR Code” tab.
-
Enter the WiFi SSID and password.
-
Click Generate QR Code.
-
The device scans the displayed QR code, connects to WiFi, and appears in the system.
-
Click OK to complete.
Method 3: Barcode Scanner
Section titled “Method 3: Barcode Scanner”-
Click Add -> “Barcode Scanner” tab.
-
Use a physical scanner to scan the device barcode or manually enter the code.
-
Click Add, then OK to confirm.
After adding, the device appears in your device list with location, name, channel list, and online status (blue = online).
Step 4: Subscribe to Cloud Recording (if required)
Section titled “Step 4: Subscribe to Cloud Recording (if required)”-
In the device list, find the channel you want to record.
-
Click the “Cloud Recording” button.
-
Click “Subscribe”.
-
Select the plan type.
-
Click “Submit” to activate.
Step 5: Configure Devices
Section titled “Step 5: Configure Devices”Use the settings icon next to each device to configure:
- Location name
- Device name and channel selection
- Channel configuration
- Remote link settings
- Storage management
- Firmware update
- Live view settings and event settings
- Local recording settings and recording schedule
Step 6: Verify and Complete Installation
Section titled “Step 6: Verify and Complete Installation”Before marking the installation complete, verify:
- All expected devices appear in the device list and show online (blue icon).
- Click each channel name to confirm live view is working.
- Cloud recording status is correct for channels that require it.
When everything is verified:
-
Click the “Installation Complete” button (top right).
-
The system sends a notification to the Client’s Main account.
-
The task status changes to “Completed” with the date/time recorded.
Done! The installation is complete and the Client can begin using their system.
4. Ongoing Operations
Section titled “4. Ongoing Operations”In addition to device installation, you may need to set up floor plans and recording schedules for the Client.
Floor Plans and Mapping
Section titled “Floor Plans and Mapping”-
Navigate to the Mapping and Tracking section.
-
Create a new floor plan or upload a map of the installation area.
-
Position devices on the floor plan for spatial awareness.
-
Choose between Floor Plan, Map, or GPS views depending on the site.
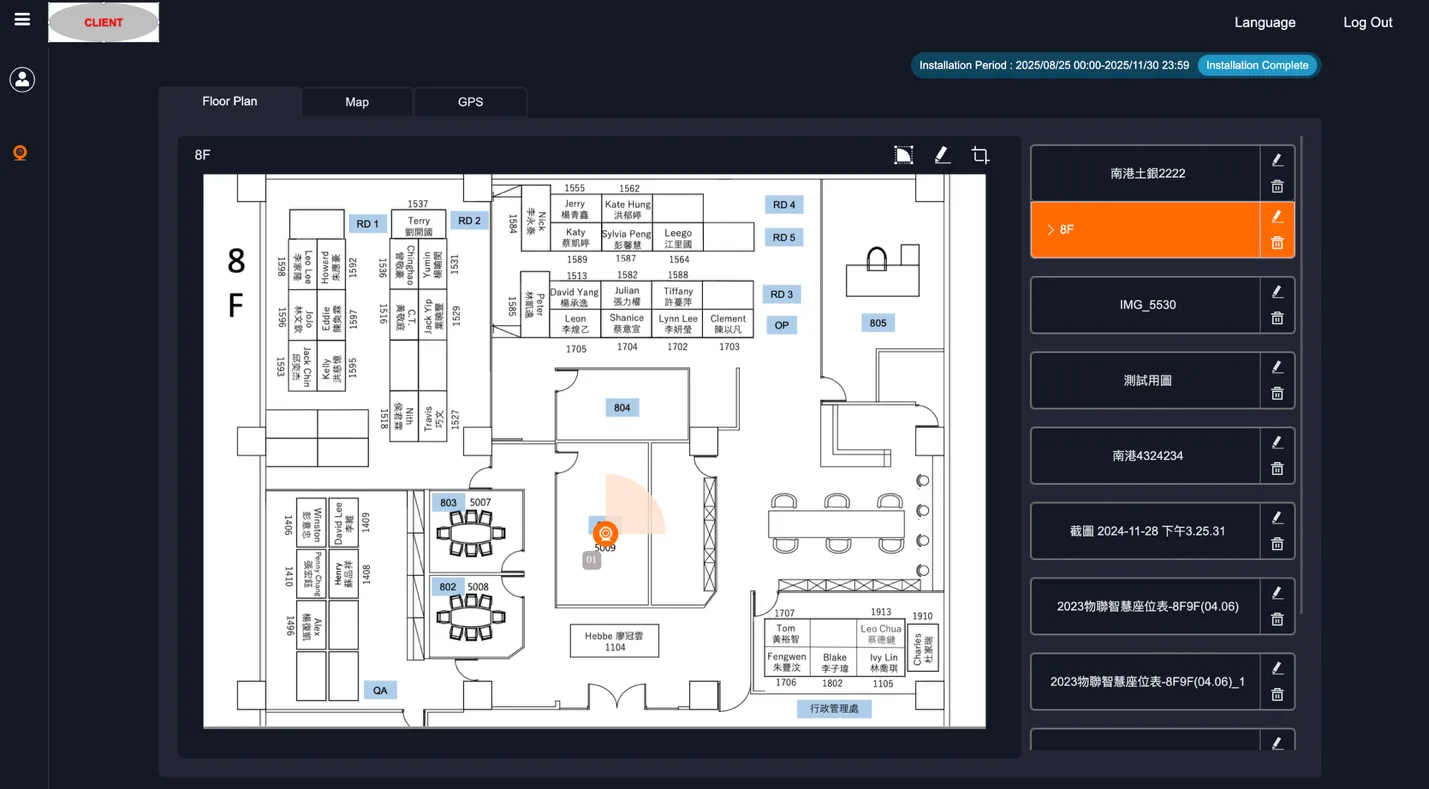
Figure: Floor Plan --- device positioning on an uploaded map with multiple floor plan options
Recording Schedule
Section titled “Recording Schedule”-
Navigate to the Schedule section.
-
Select the channel to configure.
-
Use the calendar interface to set recording times.
5. Troubleshooting
Section titled “5. Troubleshooting”Cannot Add Device
Section titled “Cannot Add Device”-
Verify device is powered on and has internet access.
-
Check network cables or WiFi connection.
-
Wait 2—3 minutes after powering on, then try again.
-
Check if the device is already added to another account.
-
Verify the UDID or QR code is correct.
-
Contact your Dealer for assistance.
Device Offline After Adding
Section titled “Device Offline After Adding”-
Check physical power and network connections.
-
Verify network settings.
-
Restart the device.
-
Check router/firewall settings.
-
Test with a different network if available.
Cannot See Assigned Client
Section titled “Cannot See Assigned Client”-
Verify the Dealer has assigned the task to you.
-
Check that the task dates are current (not expired).
-
Confirm the Client account is Active.
-
Contact your Dealer for verification.
Live View Not Working
Section titled “Live View Not Working”-
Verify device is online (blue status icon).
-
Check internet bandwidth at the installation site.
-
Try a different streaming method (P2P/Relay) in device settings.
-
Restart the device.
-
Clear browser cache.
Cloud Recording Fails to Subscribe
Section titled “Cloud Recording Fails to Subscribe”-
Check that the Dealer has allocated plans to the Client.
-
Verify available plan quota has not been exhausted.
-
Ensure the device supports cloud recording.
-
Contact your Dealer for plan allocation.
Next Steps
Section titled “Next Steps”- Verify live view for every installed device before clicking “Installation Complete” to prevent callbacks.
- Set up floor plans so the Client has spatial context for their cameras from day one.
- Configure recording schedules based on the Client’s operational hours.
- Contact your Dealer when the installation is complete or if additional tasks are needed.
Version History
Section titled “Version History”| Date | Description | Author |
|---|---|---|
| 2025/11/12 | Quick Start Guide for Technician v1.0 | Jonas Chen |
| 2025/11/14 | Add prerequisites and role structure | Jonas Chen |
| 2026/03/20 | Align to standard QIG structure | Louis/Jonas Chen |