Quick Start Guide for Mobile App
Quick Start Guide for Kalay Mobile
The companion app for Kalay Cloud VMS --- iOS and Android
1. Before You Start
Section titled “1. Before You Start”-
Kalay Cloud VMS Account Activated --- your account has been created and you can log in to the web platform.
-
Devices Added --- cameras/devices have been added to Kalay Cloud VMS (or you have permission to add them).
-
App Access Requested --- contact your TUTK sales representative or Dealer to request Kalay Mobile app access.
2. Getting Started --- Your First 5 Minutes
Section titled “2. Getting Started --- Your First 5 Minutes”Follow these steps to download, install, log in, and start monitoring.
Step 1: Download and Install
Section titled “Step 1: Download and Install”iOS (via TestFlight)
Section titled “iOS (via TestFlight)”-
Provide your Apple ID email to your TUTK contact.
-
Check your email for a TestFlight invitation.
-
Tap “View in TestFlight” in the email. Install TestFlight from the App Store if prompted.
-
Open TestFlight, find Kalay Mobile, and tap “Install”.
Android (via APK)
Section titled “Android (via APK)”-
Download the APK file from the link provided by TUTK.
-
Open Settings -> Security and enable “Install from Unknown Sources”.
-
Locate and tap the APK file to install.
Step 2: Log In (1 min)
Section titled “Step 2: Log In (1 min)”-
Open the Kalay Mobile app.
-
Enter your email (same as your Kalay Cloud VMS account).
-
Enter your password.
-
Tap “Login”.
What success looks like: You land on the Home screen with your device/location list and live channel previews visible.
Step 3: Explore the Home Screen
Section titled “Step 3: Explore the Home Screen”The Home screen is your central hub for all camera access:
| Area | What It Does |
|---|---|
| Location/Device list (top) | Horizontal scrollable list --- tap to filter channels by location or device |
| Channel list (below) | Vertical scrollable --- shows all channels in the selected location/device. First visible channel auto-plays. |
| View mode (dropdown) | Switch between Location Mode (default) and Device Mode |
| Grid icon (top right) | Multi-channel view --- up to 4 cameras simultaneously in portrait or landscape |
| + button (top right) | Add a new device (Main account only) |
| Bottom tabs | Event |
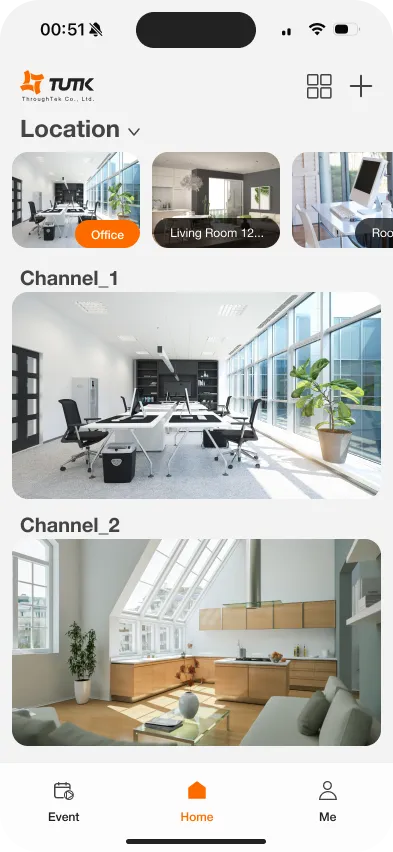
Figure: Home screen --- Device view with location list (top), channel previews, and bottom navigation
Step 4: View Live Video
Section titled “Step 4: View Live Video”-
Tap any channel on the Home screen.
-
The live feed opens with controls below the video:
| Control | Function |
|---|---|
| Speaker | Toggle audio on/off |
| Microphone | Two-way audio (if supported by the device) |
| Screenshot | Capture the current frame to your device |
| Record | Record live video to your device |
| Full Screen | Switch to landscape mode |
| PTZ | Pan/Tilt/Zoom controls (if supported by the device) |
| Playback | Open timeline view for event recording playback |
- Swipe left/right to switch between channels in the same location/device.
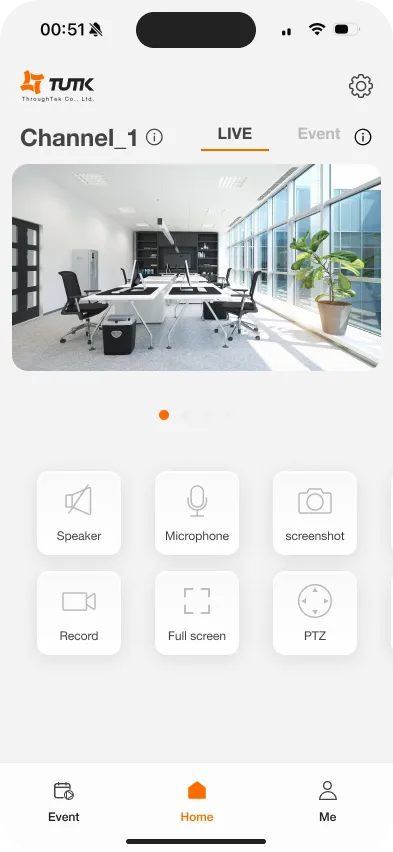
Figure: Live View --- single channel with Speaker, Microphone, Screenshot, Record, Full Screen, and PTZ controls
Step 5: Verify Setup
Section titled “Step 5: Verify Setup”- Confirm at least one live camera feed is streaming.
- Swipe between channels to verify all assigned cameras are visible.
- Check that push notifications are enabled (they are on by default).
Done! You are ready for daily mobile monitoring.
3. Ongoing Operations
Section titled “3. Ongoing Operations”Your day-to-day mobile workflow includes event review, timeline playback, notification management, and device administration.
Events
Section titled “Events”-
Tap the “Event” tab at the bottom. Default view shows today’s events from all channels.
-
Filter by date (up to 30 days back), Location/Device, Channel, or event type (Human, Vehicle, PIR, Loiter Detection, etc.).
-
Tap the play button on any event thumbnail to watch.
-
Tap Share to generate a link (recipients can view in browser without the app), or Download to save to your photo gallery. Note: only cloud events can be shared. Downloaded events are saved locally.
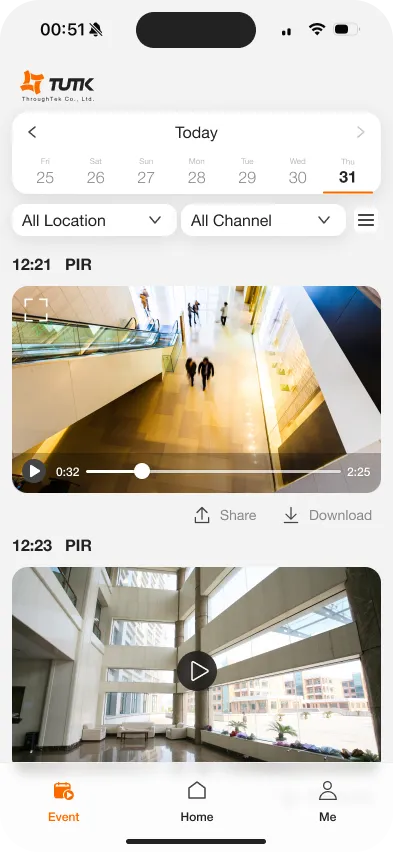
Figure: Events --- date filter (top), Location/Channel filter, event thumbnails with play, share, and download
Timeline Playback
Section titled “Timeline Playback”-
From Live View, tap the “Playback” icon.
-
The timeline appears below the video with colored event segments.
-
Drag left/right to scrub through time. Pinch to zoom (1 min / 5 min / 15 min intervals).
-
Use Previous/Play/Next controls to navigate between events.
-
Tap the date to switch to a different day (up to 30 days back).
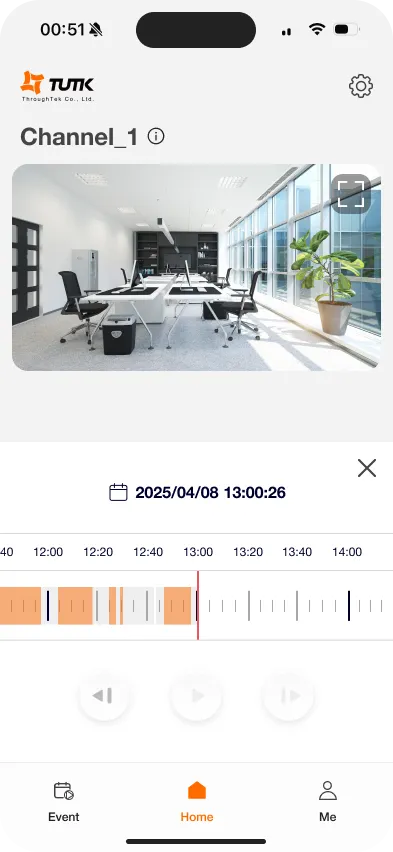
Figure: Timeline Playback --- colored event segments, drag to scrub, pinch to zoom, date picker
Push Notifications
Section titled “Push Notifications”Push notifications are enabled by default for all channels when you first log in.
Customize per Channel
Section titled “Customize per Channel”-
Go to Me -> Notifications.
-
Channels are grouped by Location or Device. Expand a group.
-
Toggle each channel on (green) or off (gray).
When an event is detected, a push notification appears showing the event type and channel name. Tap the notification to jump directly to that channel’s live view.

Figure: Push Notifications --- per-channel toggles grouped by Location, with green (on) and gray (off) states
Device Management (Main Account Only)
Section titled “Device Management (Main Account Only)”If you have device management permissions (Main account), you can add devices directly from your phone:
Add via QR Code Scan
Section titled “Add via QR Code Scan”-
Tap the ”+” button on the Home screen.
-
Allow camera access and point at the device QR code (on the device label or device settings -> TUTK -> Bind QR code).
-
Enter a Device Name (required) and select or create a Location.
-
Tap “Next”, wait for binding, then tap “Done”.
Add via WiFi QR Code
Section titled “Add via WiFi QR Code”-
Tap ”+” -> QR code icon (top right).
-
Enter the WiFi SSID and password.
-
Tap “Generate QR Code”. The device scans it and connects.
-
Enter Device Name and Location, then tap “Next” to complete.
Device Settings
Section titled “Device Settings”From Live View, tap the gear icon to view device/channel name, location, firmware version, cloud recording status, and storage capacity. Main accounts can also Reload or Delete devices.
Account Settings
Section titled “Account Settings”Tap the “Me” tab to view your account name and email. Additional options include notification preferences, Terms of Use, Privacy Policy, Open Source License, app version, and Log Out.
4. Troubleshooting
Section titled “4. Troubleshooting”Cannot See Live View
Section titled “Cannot See Live View”-
Verify the device is online.
-
Check your mobile internet connection.
-
Close and reopen the app.
-
Pull down on the Home screen to refresh.
-
Clear app cache or reinstall.
Events Not Showing
Section titled “Events Not Showing”-
Verify event recording is enabled in Kalay Cloud VMS.
-
Check that the cloud plan is active and not expired.
-
Confirm the device has internet connection.
-
Check event type filter settings in the Events tab.
-
Verify the recording schedule in Kalay Cloud VMS.
Push Notifications Not Received
Section titled “Push Notifications Not Received”- Check OS notification permissions:
- iOS: Settings -> Kalay Mobile -> Notifications
- Android: Settings -> Apps -> Kalay Mobile -> Notifications
-
Verify the channel toggle is ON in Me -> Notifications.
-
Confirm alert types are configured in Kalay Cloud VMS.
-
Test by triggering motion in front of the camera.
Cannot Add Device
Section titled “Cannot Add Device”-
Verify you have device management permissions (Main account).
-
If the ”+” button is not visible, contact your administrator.
-
Confirm the device is powered on and online.
-
Check if the device is already bound to another account.
-
Ensure the correct QR code is used (device must be in binding mode).
-
Contact your Technician if the device is not in binding mode.
Device Shows Offline
Section titled “Device Shows Offline”-
Check physical power and network cables.
-
Verify router/network is working.
-
Restart the device (unplug and replug).
-
Wait 2—3 minutes for reconnection.
Video is Lagging or Stuttering
Section titled “Video is Lagging or Stuttering”-
Check your mobile internet speed.
-
Switch to WiFi if using mobile data.
-
Move closer to the WiFi router.
-
Close other apps to free resources.
-
Reduce the number of channels in multi-view.
Login Failed
Section titled “Login Failed”-
Verify email and password are correct (same as Kalay Cloud VMS).
-
Check the account activation email if not yet activated.
-
Ensure the account is not disabled or inactive.
-
Try password reset if forgotten.
-
Contact your Dealer if account issues persist.
Next Steps
Section titled “Next Steps”- Customize push notifications to only receive alerts from channels that matter to you.
- Try multi-channel view by tapping the grid icon for split-screen monitoring.
- Use timeline playback with pinch-zoom for fast incident review.
- Refer to Kalay Cloud VMS for alert type configuration, sub-account management, and advanced settings.
System Requirements
Section titled “System Requirements”iOS: iOS 14.0 or later. Compatible with iPhone. Languages: English, Traditional Chinese.
Android: Android 12.0 or later. Compatible with smartphones and tablets. Languages: English, Traditional Chinese.
Version History
Section titled “Version History”| Date | Description | Author |
|---|---|---|
| 2025/11/19 | Kalay Mobile Quick Start Guide v1.0 | Emma |
| 2026/03/20 | Align to standard QIG structure | Louis |